|
|
LackeyCCG Tutorial Table of Contents:
Instead of this written tutorial, you can watch the video tutorials at the Getting Started with LackeyCCG page.
Installation
Installing LackeyCCG
Updating LackeyCCG
Installing/Updating Plugins
How to Connect to the Lackey Game Matching Server and Host or Join a game
Proxy Server Tutorial
LackeyCCG Game Window
The main menu and panel tabs area
The card viewer, player stats, & turn stats area
The table area
The bottom game zone area
The right game zone and tokens area
The game chat log area
Sound Share Tutorial: Share and play sound files in game
Chat Log Commands Tutorial: Learn to configure and customize your chat preset buttons
Deck Editor Window
The card viewer & filters area
The deck list area
The library of all cards area
The card pool and packs area
Plugin Creation Tutorial
Read my thoughts on CCG design theory
FAQ, Troubleshooting, & Tips
The main LackeyCCG Game window
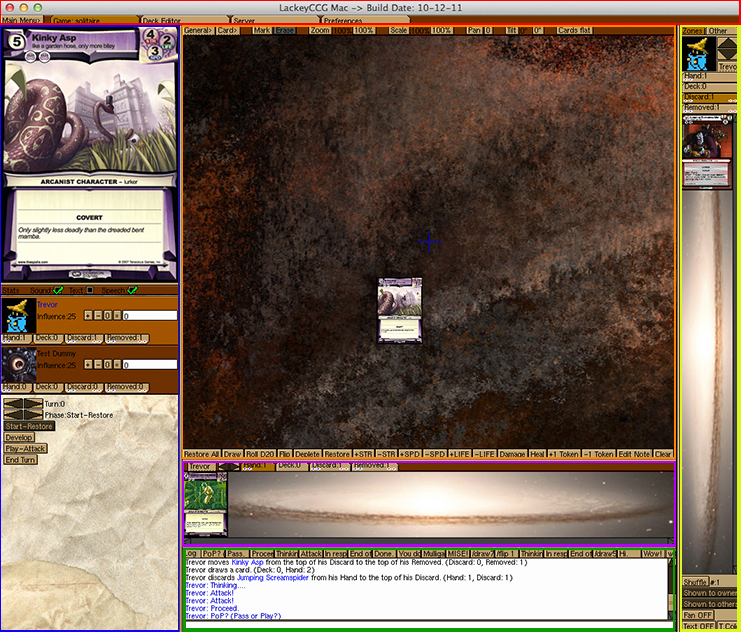
This tutorial will explain the different parts of the game window. The tutorial is separated into subsections, corresponding to the colored regions in the picture above. According to the color coding, they are:
The main menu and panel tabs, explained here.
The card viewer, player stats, & turn stats area, explained here.
The table area, explained here.
The bottom game zone area, explained here.
The right game zone and tokens area, explained here.
The game chat log area, explained here.
You can resize them by dragging the resize bars that separate them.
| >>> The main menu and panel tabs |

At the top of the LackeyCCG window is the Main Menu. The following is a list of what the Main Menu allows you to do. Hopefully, most of these should be self-explanatory.
| Menu Function Label |
What it does: |
| Start Hosting a Game... |
This opens up the menu for hosting a game. |
| Join a Game by IP... |
This opens up the menu for joining a game. |
| Disconnect from Server |
Disconnect from the Game Matching Server. |
| Disconnect from Game |
Disconnect from your current game. |
| New Game |
This starts a new game. |
| Save Game |
This manually saves the current game. |
| Load Saved Game |
This loads the previously saved game. |
| Revert to AutoSave 1 |
At the end of each phase of the turn the game is saved automatically. You can select this to revert to the most recent autosaved game. |
| Revert to AutoSave 2 |
This is like the previous, but this reverts to the 2nd most recent autosaved game. |
| Toggle Full Screen |
This lets you toggle between fullscreen and windowed mode. |
| Clear Log |
This will clear the chat log. |
| Clear Table |
This removes all cards from the table. |
| Toggle Hidden Play Mode |
This toggles hidden play mode. While in hidden play mode, all your cards are invisible to other players. |
| Get up from seat and spectate |
This will vacate your current seat and make you a spectator. |
| Edit Preferences... |
This opens up the preferences panel. |
| Save Preferences |
This will save your current preferences. |
| Check for updates |
This will launch LackeyCCG Updater.exe which can update the LackeyCCG Program (not plugins, but the program itself). |
| Add Seat |
The host of a game can use this option to add another seat to the game, up to 10 seats. |
| Remove Seat |
The host of a game can remove a vacant seat. |
| Quit |
This closes the game. |
There are also tabs that you can select to view other aspects of LackeyCCG beyond the game window.
The Game Tab will show you how many people are connected to you, as well as a swirling network activity indicator, and an [x] button that will let your disconnect from your current game (if you are connected to one). If there is game chat in the log while you are looking at a different window, you will also see the counter of unseen log messages over the Game Tab.
The Deck Editor Tab is used for constructing and loading decks. A more comprehensive tutorial for the Deck Editor is on another page.
The Server Tab is used for connecting to a server and, once connected, talking to other players and hosting and joining games.
The Preferences Tab, itself with several subsections, is used for configuring your preferences. |
| >>> The card viewer, player stats, & turn stats area |
 At the top is where the large image of a card is displayed. Below that is some options to toggle sound, card text, and text-to-speech (the latter being only enabled on macs at present). When card text is toggled on, a box filled with the card's text will be drawn over the card image area. At the top is where the large image of a card is displayed. Below that is some options to toggle sound, card text, and text-to-speech (the latter being only enabled on macs at present). When card text is toggled on, a box filled with the card's text will be drawn over the card image area.
Below that is the Player Stat area. This area is composed of 4 parts:
The player's avatar is displayed at the top left.
The player's name is displayed at the top, in that player's color.
If the currently loaded plugin has any player stats, each is displayed along with buttons to change them. Left-clicking the [+] button will increment the stat, whereas right-clicking will add the value that is in the field to the right. The [-] button works similarly, but with subtraction. Left-clicking the [0] button will set the stat to 0. Right-clicking the [0] button will set the field to the right to 0. You can also type in the value you want to set the stat to directly into the field, and then press enter.
The bottom of each player stat area has a tab for each game zone, such as your hand or your deck. Each of these game zone tabs are labeled with a name and show the number of cards in that zone. There are also game zone visibility symbols. A blue set of eyes means it's owner can see it. A red set of eyes means everyone can see it. One red eye means some people can see the zone, but not everyone. Cards can also be dropped onto these tabs as a means of adding them to the corresponding game zone.
Left-clicking on the left half of the game zone tabs will make the corresponding game zone visible in the game zone viewer that is below the table. Left-clicking on the right half game zone tabs will make the corresponding game zone visible in the game zone viewer that is to the right of the table.
Right-clicking the game zone tabs will bring up a menu that lets you do things like shuffle that zone.
Right-clicking the empty space (where there are no buttons or tabs) will bring up a menu allowing you to do things like Add X to a stat, set a stat to X, or get out of that seat.
While you mouse over a player stat, you can use the up and down arrow keys on your keyboard to increment and decrement that stat.
At the bottom of this section are buttons to advance the turn (or phase of the turn). Or you can hit the buttons to jump to a specific phase of the turn. In addition to the buttons, while holding the control key, the down and up arrow keys will advance the phases of the turn, while the right and left arrow keys will advance the turn. When you are done with your turn, just hit control+right arrow key to let your opponent know.
|
| >>> The table area |
The top of the table area first has 2 menus. The first is a menu containing "General" game functions. This includes functions like flipping a coin, rolling a die, drawing a card, or many other general types of game functions. The second menu contains "Card" functions. A card function is a function that is performed on the currently selected cards, like adding a counter, turning that card face-down, or adding a note to the selected card(s). General functions can do things that affect cards, like move them from one zone to another, but Card functions are for actions that are to be performed on currently selected cards whereas General functions do not require any cards to be selected. The particular contents of the General and Card function menus depends on how the plugin maker constructed the plugin.
To the right of the General and Card function menus is a series of controls for how you view the table.
Mark: Left-click to toggle marking on. While marking, left-click on the table to draw an "X" or left click and drag on the table to draw an arrow. While marking, the space bar key will stop marking.
Right-click
to toggle the displaying of the lengths of the arrows drawn.
Erase: Click this button to erase all marks on the table. The escape key will also erase all marks on the table.
An additional way to mark the table is to scroll wheel click and drag on the table with your mouse.
Zoom: Left-click the Zoom button to toggle zooming. While zooming is active, left-click the table and drag up and down to zoom in and out, respectively. While zooming, the space bar key will toggle off zooming.
100%: The 100% button, to the immediate right of the Zoom button, will instantly set the table zoom to the default 100%.
An additional way to zoom the table is to use the scroll wheel on your mouse (while your cursor is over the table).
Scale: The scale button works similar to the zoom button, except instead of actually zooming the camera in on the table, you are increasing the scale of the cards that are drawn on the table.
100%: The 100% button, to the immediate right of the Scale button, will instantly set the table scale to the default 100%.
An additional way to change the scale of cards on the table is to use the scroll wheel on your mouse (while your cursor is over the table) while also holding down the command key on your keyboard.
Pan: The pan button allows you to toggle panning. While panning is active, left-click the table and drag to pan where the camera is focused. While panning, the space bar key will toggle off panning.
0: The 0 button to the immediate right of the pan button will reset the table panning to the default value of 0.
An additional way to pan the table is to left-click your mouse (while your cursor is over the table) while holding down the alt (or option on macs) key, and then drag to where you want to pan to.
Tilt: Left-click to toggle tilting on. While tilting, left-click on the table and drag up or down to tilt the table forward or back, respectively.
0º: The 0 degrees button to the immediate right of the Tilt button will instantly set the table to 0 degrees, i.e., flat. If the table is already flat, the 0 degrees button will tilt the table to the previous non-zero tilt (if you have previously tilted the table).
An additional way to tilt the table is to use the scroll wheel on your mouse (while your cursor is over the table) while holding down the alt (or option on macs) key.
Yet another way of toggling the tilt on the table is the HOME key on your keyboard. Click that to toggle the table from flat to tilted, and vice versa.
Cards Flat/Cards stand: While the table is tilted (not flat) you can click this button to toggle if cards are drawn flaw on the table, or standing on the table. A card game generally doesn't view cards standing up, but a board game like Stratego might want to view the pieces standing up off the board. Remember, if the table is flat, cards will be drawn flat regardless of the Cards stand button.
Another table viewing feature you can do is something called "Quick Zoom". This is a combination of zooming and panning. If you hold down the alt key and scroll wheel click on the table, you will be able to quickly zoom and pan onto the selected area of the table. This "Quick Zoom" will only last as long as you hold down your scroll wheel click.
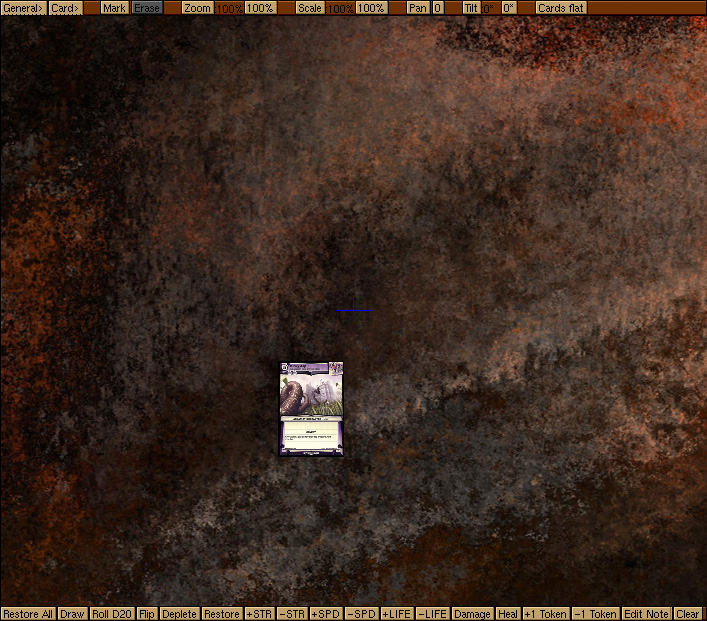
When you right-click the cards on the table, you will be able to access all of the Card functions listed in the card functions menu. When you right-click on an empty region of the table, you will be able to access all of the General functions listed in the general functions menu. Remember that the exact functions listed are different with every plugin and which you see are determined by the plugin maker.
Below the table there are a row of buttons. These are a subset of the General and Card functions that the plugin maker has deemed to be frequently used, and therefore has added them as easily clicked buttons. Clicking one of these buttons should be faster than using the corresponding function from the General or Card menus, but the result is the same. The buttons are arranged such that all of the General buttons are on the left, and all of the Card buttons are on the right.
Card functions that increment or decement a stat on a card also have an additional functionality. Suppose you have a button that says "Red+1", i.e., it increments the number of red counters on selected cards. If you right click this button, you will toggle "Red+1" mode. While active, any card you left-click (whether selected or not) will get an additional red counter on it. While in this counter adding mode, you can toggle this mode off by hitting the escape key or space bar.
Clicking the Edit Note button will open up the menu to edit notes on cards.
Clicking the Clear button will clear the selected cards of all counters, notes, and rotations.
You can alter cards on the table a number of ways with various combinations of keys and mouse clicks:
Double-click a card to rotate it.
Control + left-click
a card to turn it face up or down.
While moving a card, hold alt to rotate the card, or hold control to turn the card face up or face down.
While mouse over a card, hold down the ~ key (the key to the left of the 1 on a QWERTY keyboard) to see that card's text drawn. That is handy if the card's text differs from that of the card image, such as if there was errata for the card.
|
| >>> The bottom game zone area |

The bottom game zone area is in many ways similar to the right game zone area. They both allow you to see the cards of a game zone. You may choose to use one and collapse the other, or use both. Personally, I prefer to have both open. In one I like to see my hand, and in the other I usually look at my or my opponent's discard pile.
At the top of the bottom game zone area is a player selector, indicating who owns the game zone it is currently displaying. The arrow keys next to the player selector cycle through the players.
Then there are Game Zone Tabs, one of which is selected. The selected game zone tab corresponds to the game zone that is currently displayed below. Left-click to select a different game zone to display below. Right-click to view the game zone menu for that zone, allowing you to do things like shuffle that zone.
You can also drop cards onto these tabs to drop them to the top of the corresponding game zone. If you hold down shift as your drop a card onto the tab, you will instead send the card to the bottom of that game zone. The "eye ball" game zone visibilty symbols work on these tabs the same as with the player stat tabs.
At the bottom of the game zone area is where the game zone is actually displayed. If the game zone is visible to you, you can perform all the same actions on cards as you could if they were on the table, such as double-clicking them to rotate them.
If you don't like the spacing of the cards as they are displayed, you can fan them in or out by scrollwheel-clicking in this area and dragging left and right.
You can right-click on the cards themselves to see a menu of card functions you can perform on them, such as adding a counter to the selected card. If you right-click anywhere else, you will see a menu listing functions you can do on the currently displayed game zone, such as shuffling it.
|
| >>> The right game zone and tokens area |
 This area contains both the right game zone view, as well as an "Other" panel. You can select which you are using by selecting the tab at the very top of the area. This area contains both the right game zone view, as well as an "Other" panel. You can select which you are using by selecting the tab at the very top of the area.
The right game zone view functions very much like the bottom game zone area, except that it has a few more uses. In addition to having a player selector, it also displays the avatar of the player whose game zone is currently being displayed.
There are also additional buttons at the bottom that affect the currently displayed game zone.
The Shuffle button shuffles the selected game zone.
There are two buttons that let you toggle if the game zone is visible to its owner, or to people other than its owner. You can also change visibility by using the right-click menus of the zone by right-clicking either the corresponding game zone tab, or in the viewer above where there isn't a card. (Right-clicking on a card would bring up the card menu instead.)
There is Fan button that allows you to toggle on fanning. While fanning is active, left-click and drag on the game zone area above to fan the cards up or down. While fanning is active, you can also left-click and drag the game zone area below the table to fan it left and right. To toggle fanning off, hit the space bar or hit the Fan button again.
An additional way to fan cards is to just scroll-wheel-click and drag.
At the bottom of the right game zone area is a button that allows you to show or hide card title labels that are drawn over cards. The card to its right allows you to cycle through the color that this label is displayed in.
When you select the Other tab, instead of view the right game zone area, you will see other miscellanous features. Additional features are being added here. Currently, this is where you can add card tokens to the table. You can search for the token you want. Once you found the token you want, you can either select it and hit the Spawn X button below, or drag the card directly onto the table. While dragging a card from the tokens list, you can use the right and left arrow keys to increment and decrement the quantity you are adding to the table.
|
| >>> The game chat log area |

At the top of the game chat log area is a row of canned-message buttons. These are pre-set with often used messages. Instead of typing out the message every time you want to say it, you can instead click one of these buttons. To change them from the default settings, you can go to the Chat sub-panel of the Preferences panel. Alternatively, you can enter the text you want to save in the input field below, and instead of hitting the return key to send it, right-click one of the canned-message buttons to save it to that button. While you mouse over a canned-message button, you will be able to see its contents displayed over the text input field below.
Below the canned-message buttons is the chat log field itself, where you can see both logs of game events (like people playing cards) as well as chat from other players. A card listed in the log can be viewed if you mouse over the card name. Chat is drawn in the color of the player who said it.
You can right-click the chat log to toggle time stamp visibility.
At the bottom of the game chat log area is the text input field. This field works like regular text fields. You can do things like "select all", "copy/paste", and highlight parts with your mouse and/or arrow keys. Right-click this field to quickly erase it's contents. If the cursor is not active for text input here, hit the tab key and it will be.
In addition to the utility described above, the game chat input field is immensely powerful, allowing you to take advantage of cool features such as Sound Share, and to implement macros to do various functions.
There are seperate tutorials for those.
You can read the Sound Share Tutorial.
You can read the Console Commands & Macros Tutorial.
|
|