|
|
LackeyCCG Tutorial Table of Contents:
Instead of this written tutorial, you can watch the video tutorials at the Getting Started with LackeyCCG page.
Installation
Installing LackeyCCG
Updating LackeyCCG
Installing/Updating Plugins
How to Connect to the Lackey Game Matching Server and Host or Join a game
Proxy Server Tutorial
LackeyCCG Game Window
The main menu and panel tabs area
The card viewer, player stats, & turn stats area
The table area
The bottom game zone area
The right game zone and tokens area
The game chat log area
Sound Share Tutorial: Share and play sound files in game
Chat Log Commands Tutorial: Learn to configure and customize your chat preset buttons
Deck Editor Window
The card viewer & filters area
The deck list area
The library of all cards area
The card pool and packs area
Plugin Creation Tutorial
Read my thoughts on CCG design theory
FAQ, Troubleshooting, & Tips
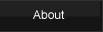
The deck editor window
This tutorial will explain the different parts of the deck editor window. The tutorial is separated into subsections, corresponding to the colored regions in the picture above. You can resize them by dragging the resize bars that separate them.
| >>> The card viewer & filters area |
 The top of this section has a large card viewer. The top of this section has a large card viewer.
Below that is a series of filters that can be turned on or off to help you find cards for deck building. For example, you could search for all cards whose type was "Character" and whose Cost was less than "5".
You can also check the box next to "Text" to always show the card text on top of the card viewer at the top. You might want to do that if the card has errata and the text on the card image is not accurate. Or you may want to view the card text if the text on the card image just isn't readable. |
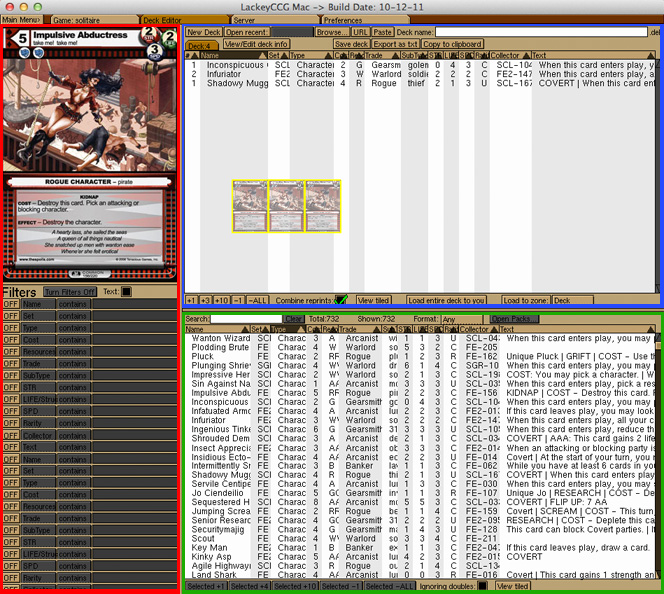
| >>> The deck list area |
The top of this section has buttons for creating, opening, and saving decks.
The "New Deck" button clears any cards from the deck list. If you have cards added already, you need to save them or they will be lost.
There are 4 different ways to load a previously made deck:
You can select the deck from the recent decks pull down menu, and then hit the "Open recent" button.
You can click the "Browse..." button and select the deck from the list of decks you have in your deck folder.
You can store a deck file online, copy the URL of the deck file, and hit the "URL" button.
You can copy the contents of a deck to your clipboard (from a deck list someone posted on a website, for example), and then hit the "Paste" button.
You can enter in the deck name and save the deck with the "Save deck" button. This will save the deck exactly as you created it, in the default .dek format.
You can also click the "Export as txt" button to make a simple text version of the deck. This simple text format just lists each card's quantity and name. The simple text format is easier to read by humans, but depending on the plugin, you may lose some information about the deck just exporting as text. A deck exported as .txt may not remember exactly what set the card you originally selected was from because the simple format only saves quantity and card name. A regular save of a deck will save all of this information.
If you click the "Copy to clipboard" button, your clipboard will be filled with your deck list (in the simple quanity and card name format) so that you can paste your deck list to another program, or post it online. (Someone could copy the result and import your deck via their "Paste" button as described above.)
Depending on how many deck zones your plugin has, you may have one or more deck zone tabs listed, starting directly under where the "New Deck" button is. A deck zone is a pile of cards you have going into a game. Some plugins have one deck zone for your main deck, another deck zone for a sideboard, or another deck zone for a "starting cards" pile. Each plugin will be different, depending on what works best for that game.
If your plugin has more than one deck zone, you can select the deck zone tab to change which subsection of the deck you are adding to. You can also drag and drop cards directly onto the deck zone tabs.
The large field is the deck list. This consists of several rows of card data. The first entry in each row is the quantity of that card in the deck list.
You can sort the deck list by clicking the column headers at the top of the deck list.
When you have an entry selected, you can use one of the five plus or minus buttons on the bottom of this section. The "+1" will increment the number of the selected card, the "+3" button will add 3 more of the selected card, and so on.
Another way to add or remove cards is to select the card in the deck list, and use the right and left arrow keys to increment and decrement it, respectively.
You can check or uncheck the Combine reprints option. When this is checked, if two cards have the same exact name but are from different sets, they will be combined together in the deck list above. The set of the first card added to the deck list will be used. If this option is not checked, your deck can have cards with the same name from different sets.
The "View tiled" button will display the contents of the deck tiled out so that all the card images can be seen. Hit the escape key or space bar to stop viewing the cards as tiled. Instead of hitting the "View tiled" button, you can just mouse over the card list and hit the space bar.
There are two ways to load the open deck to you so that you can play with it. The simple way is to just hit the "Load entire deck to you" button. This will load all deck zones to the corresponding game zones. Alternatively, you can choose to load each deck zone individually and select the destination. |
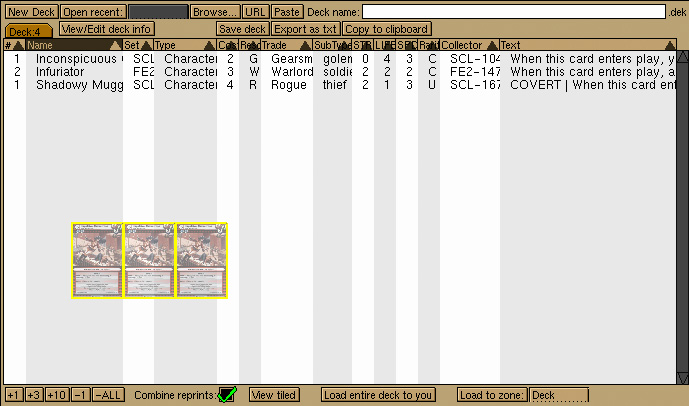
| >>> The library of all cards area |
This area contains the list of all cards in the game. When you add filters, you will see fewer cards listed here – just cards that pass those filters.
At the very top is a simple Search filter. This works just like a "Name begins with" filter. There is also a "Clear" button to turn off this simple filter. To turn off all of the filters affecting the cards below, you will need to hit the "Turn Filters Off" button in the Filters area.
There are two tallies listed at the top. The first shows the total number of all cards. The second shows the number of cards currently shown listed below. If you turn all filters off, these numbers should be equal. The exception to that is if your plugin includes token cards, in which case the total and shown tallies will always differ at least by the number of tokens included in the plugin.
Some plugins may have a "Format" pull down menu. A format acts as a series of predefined filters that only include certain sets that the plugin maker has defined. You can use format filters in addition to other filters in the Filters area.
Clicking the "Open Packs..." button will hide the full library of all cards and bring you to the card pool mode, where you can open virtual packs. The card pool and packs mode is further described later on this page.
There are several ways to add cards to the deck list.
At the bottom of the library of all cards area is a series of buttons that can be used to add cards to your deck list. Select a card, and then click the button to add that many to the currently selected deck zone in the deck list above. Another way to add or remove cards is to select the card in the library list and use the right and left arrow keys to increment and decrement it, respectively.
You can double click on a row in the deck list, and that card will be added to your deck list.
You can click and drag cards from your library to the deck list. While you are dragging cards, the right and left arrow keys can be used to increment and decrement, respectively, the amount of that card you are moving.
There is also the option to check "Ignoring doubles". If multiple cards pass the active filters and some of them have the same name, this option will allow you to only list one of them above. This is handy if you don't care about what set the card comes from, but only what its name is.
Lastly, the "View tiled" button works just like the "View tiled" button in the deck list section above, except that it will tile card images for all cards currently displayed in the libary list above. While viewing the card images as tiled, you can stop viewing them by hitting the escape key or space bar. Instead of hitting the "View tiled" button, you can mouse over the list of all cards and hit the space bar and that will also tile the currently visible cards. |
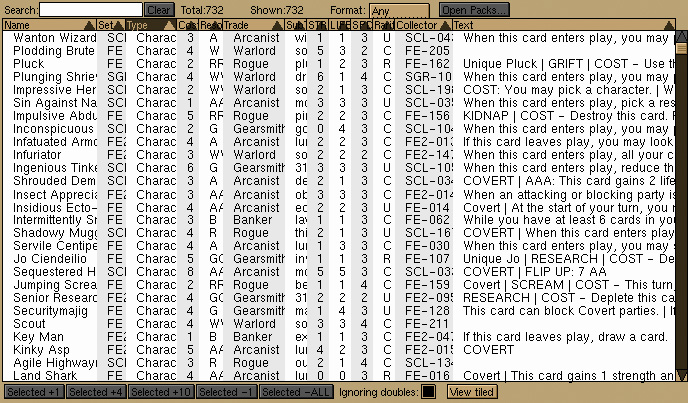
| >>> The card pool and packs area |
LackeyCCG allows you to open virtual packs, add them to a card pool, and you can use these cards to make a deck. When using the deck editor, normally you have access to any quantity of any card. When you build a deck with the card pool pane, you can restrict your options to challenge yourself.
To access the card pool pane, in the deck editor, click the "Open Packs..." button and you will see a window looking similar to the image below.
Starting from the top, the first line contains:
"Total": a total of the cards in the card pool
"Shown": the number of cards shown. This number will be the same as the total unless you have some filters enabled.
"Verify Deck": If this button is red, it means the decklist above exceeds the number of cards in your card pool. Click it to remove excess cards in your deck list.
"Add a pack...": This will open a dialogue asking which and how many of each kind of pack to add to your card pool.
"Exit card pool mode...": This will return you to the free-build normal deck editor where you can add any quantity of any card in the plugin.
"View tiled": This will tile all the card images in the card pool so you can browse them. (Mouse over the field and space bar shows them too.)
The card pool field contains the list of cards added to the card pool. You can sort them by column, use the deck editor filters to only show certain cards, and select a card to add it to your decklist. You can drag a card from this card pool field and drop it into your deck list above. While dragging a card, the right and left arrow keys on your keyboard will increment and decrement the number you are moving, respectively.
Below the card pool are first a row of 5 buttons which, based on which card is selected, will add or remove that many of the selected card to your deck list.
"Add All to Deck": This button will add all cards in your card pool to your deck. If you want to use most of the cards in your card pool, you may want to use this button and then remove the cards you don't want from your deck manually. (And remember, at any time you can verify that the cards in your deck are allowed by your card pool by hitting the "Verify Deck" button.)
"Pool name": This is the area where you can name what you want this card pool to be saved as. You might want to name it something like "SealedPacks". You don't need to type in a file suffix. By default, card pools are saved as ".dek" type files, however you can export as ".txt".
Card pools are saved in the same format as regular decks, but they are saved to different locations.
On the bottom row, to the left there are some options of opening a previously saved card pool. To the right there are some options for saving the current card pool.
"New Pool": This will remove all cards from the current card pool. Make sure you have saved your old cards or they will be lost.
"Open recent": This will open a recently saved card pool, named in the pull down selector to its right.
"Browse...": This will let you browse your previously saved card pools so that you can load them.
"URL": This button allows you to load a card pool that is stored some place online. If your friend posted his saved card pool file to his website, you can copy the URL to that file to your clipboard and then click the "URL" button and his card pool will be loaded to your card pool field. You can then see what kind of deck you would make with the same cards your friend had to choose from.
"Paste": Similar to the "URL" button, "Paste" is a way to import a card pool to your card pool field. But paste imports from an actual card pool (saved in the txt format) that was copied to your clipboard. Referring to the previous URL button example, instead of copying the URL of your friend's card pool, you could have gone to that URL, hit "select all", and copy the text to your clip board. Clicking the "Paste" button will then load those selected cards. One advantage of the "Paste" button is the cards listed usually don't even need to be saved in Lackey's saved file format. As long as a list of cards uses the QUANTITY CARDNAME format, or something similar, it should copy, and import just fine.
"Save Pool": This button will save the current card pool using the pool name entered in the field above. By default, the ".dek" format will be used.
"Export as txt": Normally, card pools are saved in the ".dek" format because that format will remember the set the card was from. The simple text format, on the other hand, will just save the file in the easy-to-read QUANTITY CARDNAME format. If you want to post your deck online, it might be a good idea to save the deck as easy-to-read simple text, but the down side about this is the set from which a card is from is not saved, so the exact version of the card you choose may not be preserved.
"Copy to clipboard": In many ways, copy to clipboard is like "Export to txt", but instead of outputting a file, it outputs it directly to your clipboard so you can easily post the card pool list to anywhere you wish.
Many of the card pool functions, such as loading, saving, URL, and Paste functions, work the same way as the functions in the deck list pane above. Much of the functionality is mirrored, so you can do the same kinds of functions for decks as you can with card pools. You can even treat deck files and card pool files interchangably. If you move a deck from your decks/ folder to your cardpools/ folder, you can load it as a card pool. If you move a saved card pool from your cardpools/ folder to your decks/ folder, you can load it as a deck.
Another functionality the card pool pane provides is a way to catalog your card collection. You can create a deck with all cards you own (since it's faster to select cards than it is to add them from packs), save it, and move it to your cardpools/ folder. When opened as a card pool, you can see your collection and only build decks with cards in your collection. You can also manually edit your collection if you save it as a text file (or even as a .dek file but that's less user friendly).
|
|